Frequently Asked Questions
Our FAQs cover General, iPad and Windows questions.
Can't find what you are looking for here? Please Contact Us.
We also have a lot of information, including "How To" guides, on our Resources page.
General Questions
What do I do once I have started a mystery session?
The first task is to read the slips, to do this you must make them larger. Once you have read all the slips, use the menu wheel to continue.
How do I resize a slip?
Slips can be resized either by using a pinch/zoom gesture with two fingers, or by pressing and holding on the slip for one second to show the resize wheel.
How do I load a menu wheel?
To show the menu wheel, press and hold without moving your finger (or mouse) for one second on an empty space on the screen.
I still can't load a menu wheel. What is wrong?
Menu wheels only appear when you click and hold on empty screen space. The wheel will only display if your finger (or mouse) is steady: moving your mouse or finger too much will prevent the menu from loading. Also, make sure you don't already have the maximum number of menu wheels open on screen - this is equal to the number of users in the session.
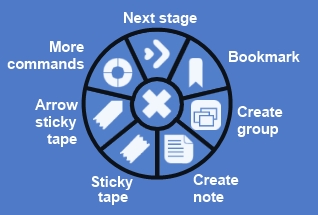
What do all the icons on the menu wheel mean?

Next stage: allows the user to progress to the next stage of the application.
Bookmark: the bookmark saves the current layout so it can be reviewed in the Reflection stage after the session is over.
Create Group: creates a Group that can store slips and other elements inside of it. The grouping stage requires you to use this element.
Create Note: creates a Note in which the user can enter a thought or useful piece of information.
Sticky Tape: creates a Sticky Tape which can be used to indicate a strong relation between slips or to add a note to a slip, by sticking them together.
Arrow Sticky Tape: works like the Sticky Tape but can be used to show a time sequence or a cause and effect.
More Commands: shows another ring of commands that are used less frequently than the ones in the main wheel.
Proceed with Override: forces the program to the next stage ignoring any end of stage criteria. Useful if a group is falling behind and need to be hurried on. However to make it clear that the override has been used, using it puts an override mark on screen so it's use does not go undetected.
Status: shows a quick summary of the current session. Includes current progress, created groups and notes.
Exit: this takes you out of the current session and back to the main menu of the application.
How do I move from one stage to the next?
To move to the next stage, press and hold on an empty space for one second to show the menu wheel, then select the next stage icon (right arrow) from the menu wheel.
Why can't I move to the next stage?
To move to the next stage, you must fulfil the requirements for the stage you are currently on. The default requirements for each stage are:
Reading - Read all the slips - to do this, you must enlarge each slip at least once
Grouping - Create at least three groups (not including the Red Herrings or Trash) and make sure every slip is in a group, and that there is at least two slips in each group.
Sequencing - This stage has a self-evaluation when completed, in which there is a prompt to build a webbed sequence.
How do I rotate a Sticky Tape?
To rotate a Sticky Tape, press and hold on the Tape to show a rotate wheel. Press and drag on the rotate wheel to rotate the Sticky Tape.
How do I know if my answer is correct?
Most of the questions in Digital Mysteries are open-ended with no one right answer. This encourages more discussions among the students and with the teacher. Such discussions combined with the open-ended question promote the use of higher level thinking skills – a main objective behind the design of Digital Mysteries.
How can I see a record of the session that I've done?
Once completed, you can generate a session report using the "View session reports" button from the main screen, then selecting the relevant session. The report shows all of the session information including the answer, groups/notes created and screen shots taken after each stage.
Do I always have to go through all 3 stages of the session?
The default configuration selected by Digital Mysteries is a three-stage session. Digital Mysteries comes with two other configurations that you can select from the "Settings" menu: A two stage configuration that has only a reading and a grouping stage, and a one stage configuration that provides all of the session tools without forcing any structure to the task. Some mysteries come with their own custom configuration that will override the selected configuration.
Digital Mysteries comes with a configuration tool that allows teachers to create their own custom configuration as needed. This configuration tool works only on Windows at the moment, but the teacher will be able to use their custom configurations with the iPad version in future releases.
How do I change the difficulty setting?
It is possible to set the difficulty setting of any mystery to be easy, medium, or hard, which changes the number of slips displayed to the students from the "Settings" button in the main application screen.
How do I teach with Digital Mysteries?
We have added a "Teaching with Mysteries" section to the app which explains the learning aspects and concepts behind Digital Mysteries.
iPad
Which Mysteries are available on the iPad?
We have a library of mysteries currently available on the Windows version of Digital Mysteries. Many of these will be getting released on the App Store in the future. At the moment, we have tasks for ages 6 to 16 (KS1-KS4) available to download here. If you have seen a mystery in our library which you would like to see on the iPad, please let us know by emailing This email address is being protected from spambots. You need JavaScript enabled to view it..
How many students can work together on one iPad?
We recommend that 2 students work together because of the limitations of space around an iPad. However Digital Mysteries can support up to 4 students at one time.
What age groups are supported by Digital Mysteries on the iPad?
We currently have tasks for ages 8 to 11 (KS2) available to download on the App Store. In the future we will be releasing more tasks from our Windows library which covers age 6 to 16.
How can I print or share session reports?
As of version 3.0 of Digital Mysteries for iPad you can print and share session reports. To do this, go to the app home screen, tap 'view session reports' then load your chosen report from the list, then tap the share button in the top right of the screen. From here you can print the report, open it in another app or attach it to an email.
Why is there no participation chart?
Since it is not possible for the iPad to distinguish between different users touching the device, the participation chart appears only when using Digital Mysteries in the multi-mouse setting on the Windows version.
How do I hide the override tool and prevent students from skipping parts of the session?
To hide the override tool, go into Settings from the main menu and turn off the "Override" setting. Turning off the override tool prevents it from showing every time the user tries and fails to move to the next stage. It will, however, still appear via the "Proceed with Override" command which is located in the outer menu wheel.
Windows
What versions of Windows does Digital Mysteries run on?
Digital Mysteries runs on Windows 7 & 8. An adapted version of Digital Mysteries that runs on Windows Vista is available on request. Unfortunately it will not run on earlier versions of Windows.
The program has failed to install. What are the possible causes of this?
There are a two probable reasons for this:
1. The .NET framework, something Digital Mysteries requires in order to work, may not have installed correctly. To install the .NET framework, download it here, install it and try running the Digital Mysteries installer again.
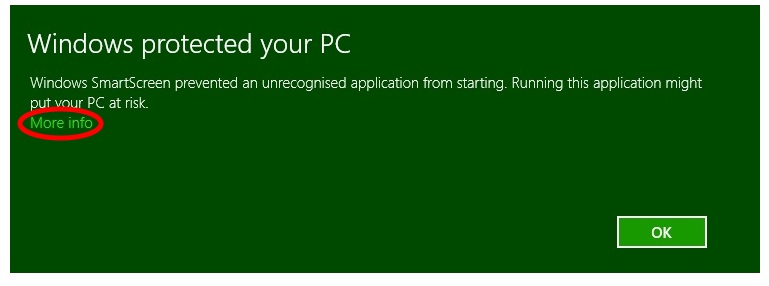
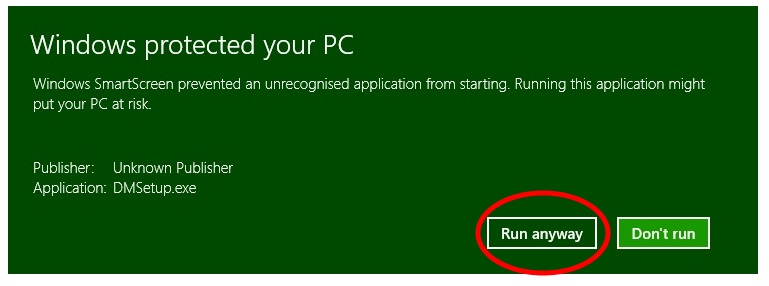
2. Windows may have prevented the app from installing with one of the following messages (the way it is presented on Windows 7 and Windows 8 is slightly different). Although this pops up, we can assure you that the program is safe to run on your computer.
Windows 7
Just click ‘run’ (circled)

Windows 8
Just click ‘more info’ (circled), then on the second screen ‘run anyway’


The program has installed but does not start up, what is wrong?
If Digital Mysteries installed but doesn't work when started, try opening the Digital Mysteries Authoring Tool. If the Authoring Tool works and Digital Mysteries doesn't then it is likely that Microsoft Surface has not installed correctly. Download the Microsoft Surface Runtime, install it and try running Digital Mysteries again.
My license key did not work, why is this?
Please ensure you have copied all 4 lines of the license key into the box and that you are connected to the internet at the time to activate the product. Also ensure that your network can access "reflectivethinking.com".
It says I need Administrative privileges to activate my License key, how do I do this?
To run the program as Administrator, right-click the app icon and click "run as administrator". If you are not the administrator, please contact your administrator so that they can validate the license key. Once the key is validated you do not need to run the program as administrator.
How do I switch between Mouse and Touch mode?
To switch input mode, go to the settings screen from the main menu and choose Mouse or Touch mode.
Why do I have more mouse devices visible than I want/need?
Digital Mysteries provides a cursor for every mouse device Windows has detected on your machine. This will include touch-pads on Laptops but sometimes it will detect a device that is not actually there.
How do I choose which mouse devices I want to use?
To turn off any unwanted devices, click "Manage Devices" from the User name dialog and untick any cursors which match up to the devices you want to disable.
I have a mystery file I would like to add to Digital Mysteries. How do I do this?
To add a file to the Digital Mysteries library, go to the "Settings" screen from the main menu and select "Import mystery from file". Locate the file you wish to add and click "Open" to import it to the database.
